
Observability for Spring AI (Java) with Opik
Spring AI is a framework designed to simplify the integration of AI and machine learning capabilities into Spring applications. It provides a familiar Spring-based programming model for working with AI models, vector stores, and AI-powered features, making it easier to build intelligent applications within the Spring ecosystem.
Spring AI's primary advantage is its seamless integration with the Spring framework, allowing developers to leverage Spring's dependency injection, configuration management, and testing capabilities while building AI-powered applications.
Getting started
Section titled “Getting started”To use the Spring AI integration with Opik, you will need to have Spring AI and the required OpenTelemetry packages installed. The easiest way to start is to use the OPIK SpringAI starter project.
Prerequisites
Section titled “Prerequisites”Before running the demo application, ensure you have the following installed:
- Java 21 or higher
- Maven 3.6+ for dependency management and building
- OpenAI API Key (only for Opik Cloud) - Sign up at OpenAI Platform
- OPIK API Key - Sign up at Comet OPIK
Installation
Section titled “Installation”1. Clone the Repository
Section titled “1. Clone the Repository”git clone git@github.com:comet-ml/opik-springai-demo.git
cd opik-springai-demo2. Verify Java Installation
Section titled “2. Verify Java Installation”java --versionEnsure you have Java 21 or higher installed.
3. Verify Maven Installation
Section titled “3. Verify Maven Installation”mvn --version4. Install Dependencies
Section titled “4. Install Dependencies”mvn clean installEnvironment configuration
Section titled “Environment configuration”The application requires the following environment variables to be set:
Required Variables
Section titled “Required Variables”- OPENAI_API_KEY: Your OpenAI API key
- OTEL_EXPORTER_OTLP_ENDPOINT: OPIK OpenTelemetry endpoint
- OTEL_EXPORTER_OTLP_HEADERS: Authorization headers for OPIK
Configure your environment variables based on your Opik deployment:
If you are using Opik Cloud, you will need to set the following environment variables:
export OTEL_EXPORTER_OTLP_ENDPOINT=https://www.comet.com/opik/api/v1/private/otel
export OTEL_EXPORTER_OTLP_HEADERS='Authorization=<your-api-key>,Comet-Workspace=default'If you are using an Enterprise deployment of Opik, you will need to set the following environment variables:
export OTEL_EXPORTER_OTLP_ENDPOINT=https://<comet-deployment-url>/opik/api/v1/private/otel
export OTEL_EXPORTER_OTLP_HEADERS='Authorization=<your-api-key>,Comet-Workspace=default'If you are self-hosting Opik, you will need to set the following environment variables:
export OTEL_EXPORTER_OTLP_ENDPOINT=http://localhost:5173/api/v1/private/otelUsing Opik with Spring AI
Section titled “Using Opik with Spring AI”Set up OpenTelemetry instrumentation for Spring AI in your application.yaml:
spring:
  application:
    name: spring-ai-opik-demo
  ai:
    openai:
      api-key: ${OPENAI_API_KEY}
      chat:
        options:
          model: gpt-4o
          temperature: 0.7
server:
  port: 8085

# Enable OpenTelemetry tracing
management:
  tracing:
    sampling:
      probability: 1.0 # Sample all traces
  opentelemetry:
    tracing:
      export:
        otlp:
          endpoint: ${OTEL_EXPORTER_OTLP_ENDPOINT}
          headers: ${OTEL_EXPORTER_OTLP_HEADERS}

# Disable metrics and logs exporters via OpenTelemetry to avoid putting an extra load on the OpenTelemetry collector
otel:
  metrics:
    exporter: none
  logs:
    exporter: none
Your Spring AI code will now automatically send traces to Opik:
import io.micrometer.tracing.Span;
import io.micrometer.tracing.Tracer;
import org.springframework.ai.chat.client.ChatClient;
import org.springframework.ai.chat.prompt.Prompt;
import org.springframework.lang.NonNull;
import org.springframework.stereotype.Service;
import org.springframework.util.CollectionUtils;

import java.util.List;
import java.util.Map;
import java.util.Objects;

/**
 * Service class responsible for handling chat-related operations.
 * Provides functionality to interact with an underlying LLM chat client.
 */
@Service
public class ChatService {

    private static final String TAGS_KEY = "opik.tags";
    private static final String METADATA_PREFIX = "opik.metadata.";

    private final Tracer tracer;
    private final ChatClient chatClient;

    public ChatService(ChatClient.Builder chatClientBuilder, Tracer tracer) {
        this.chatClient = chatClientBuilder.build();
        this.tracer = tracer;
    }

    public String askQuestion(@NonNull String question) {
        return chatClient
                .prompt(new Prompt(question))
                .call()
                .content();
    }

    public String askQuestion(@NonNull String question, List<String> tags, Map<String, String> metadata) {

        Span span = tracer.currentSpan();
        if (Objects.nonNull(span)) {
            setTags(span, tags);
            setMetadata(span, metadata);
        }

        return chatClient
                .prompt(new Prompt(question))
                .call()
                .content();
    }

    private void setTags(@NonNull Span span, List<String> tags) {
        if (!CollectionUtils.isEmpty(tags)) {
            span.tagOfStrings(TAGS_KEY, tags);
        }
    }

    private void setMetadata(@NonNull Span span, Map<String, String> metadata) {
        if ( !CollectionUtils.isEmpty(metadata) ) {
            // populate metadata
            metadata.forEach((String k, String v) ->
                    span.tag(METADATA_PREFIX + k, v));
        }
    }
}
Running the Demo Application
Section titled “Running the Demo Application”After cloning the OPIK SpringAI starter repository, you can run the demo application using one of the following methods:
Method 1: Using Maven Spring Boot Plugin
Section titled “Method 1: Using Maven Spring Boot Plugin”export OTEL_EXPORTER_OTLP_HEADERS='Comet-Workspace=default,projectName=otel-springai-test' \
export OPENAI_API_KEY=sk-proj-your-api-key \
export OTEL_EXPORTER_OTLP_ENDPOINT=http://localhost:5173/api/v1/private/otel
mvn spring-boot:runMethod 2: Using JAR File
Section titled “Method 2: Using JAR File”mvn clean package
export OTEL_EXPORTER_OTLP_HEADERS='Comet-Workspace=default,projectName=otel-springai-test' \
export OPENAI_API_KEY=sk-proj-your-api-key \
export OTEL_EXPORTER_OTLP_ENDPOINT=http://localhost:5173/api/v1/private/otel
java -jar target/spring-ai-demo-opik-0.0.1-SNAPSHOT.jarMethod 3: Development Mode with Auto-reload
Section titled “Method 3: Development Mode with Auto-reload”export OTEL_EXPORTER_OTLP_HEADERS='Comet-Workspace=default,projectName=otel-springai-test' \
export OPENAI_API_KEY=sk-proj-your-api-key \
export OTEL_EXPORTER_OTLP_ENDPOINT=http://localhost:5173/api/v1/private/otel
mvn spring-boot:run -Dspring-boot.run.jvmArguments="-Dspring.devtools.restart.enabled=true"The application will start on http://localhost:8085
Testing the Demo Application using REST API
Section titled “Testing the Demo Application using REST API”After that you can send a request to the application endpoints to interact with the chatbot:
curl --get --data-urlencode "question=How to integrate Spring AI with OpenAI for building chatbots?" http://localhost:8085/api/chat/ask-meOr POST request to the /api/chat/ask-enhanced endpoint with TAGS and METADATA in the body:
curl -X POST \
  -H "Content-Type: application/json" \
  -d '{
    "question": "What are the benefits of using Spring AI?",
    "tags": ["spring", "ai", "tutorial"],
    "metadata": {
      "userId": "user123",
      "sessionId": "session456",
      "category": "educational"
    }
  }' \
  http://localhost:8085/api/chat/ask-enhanced
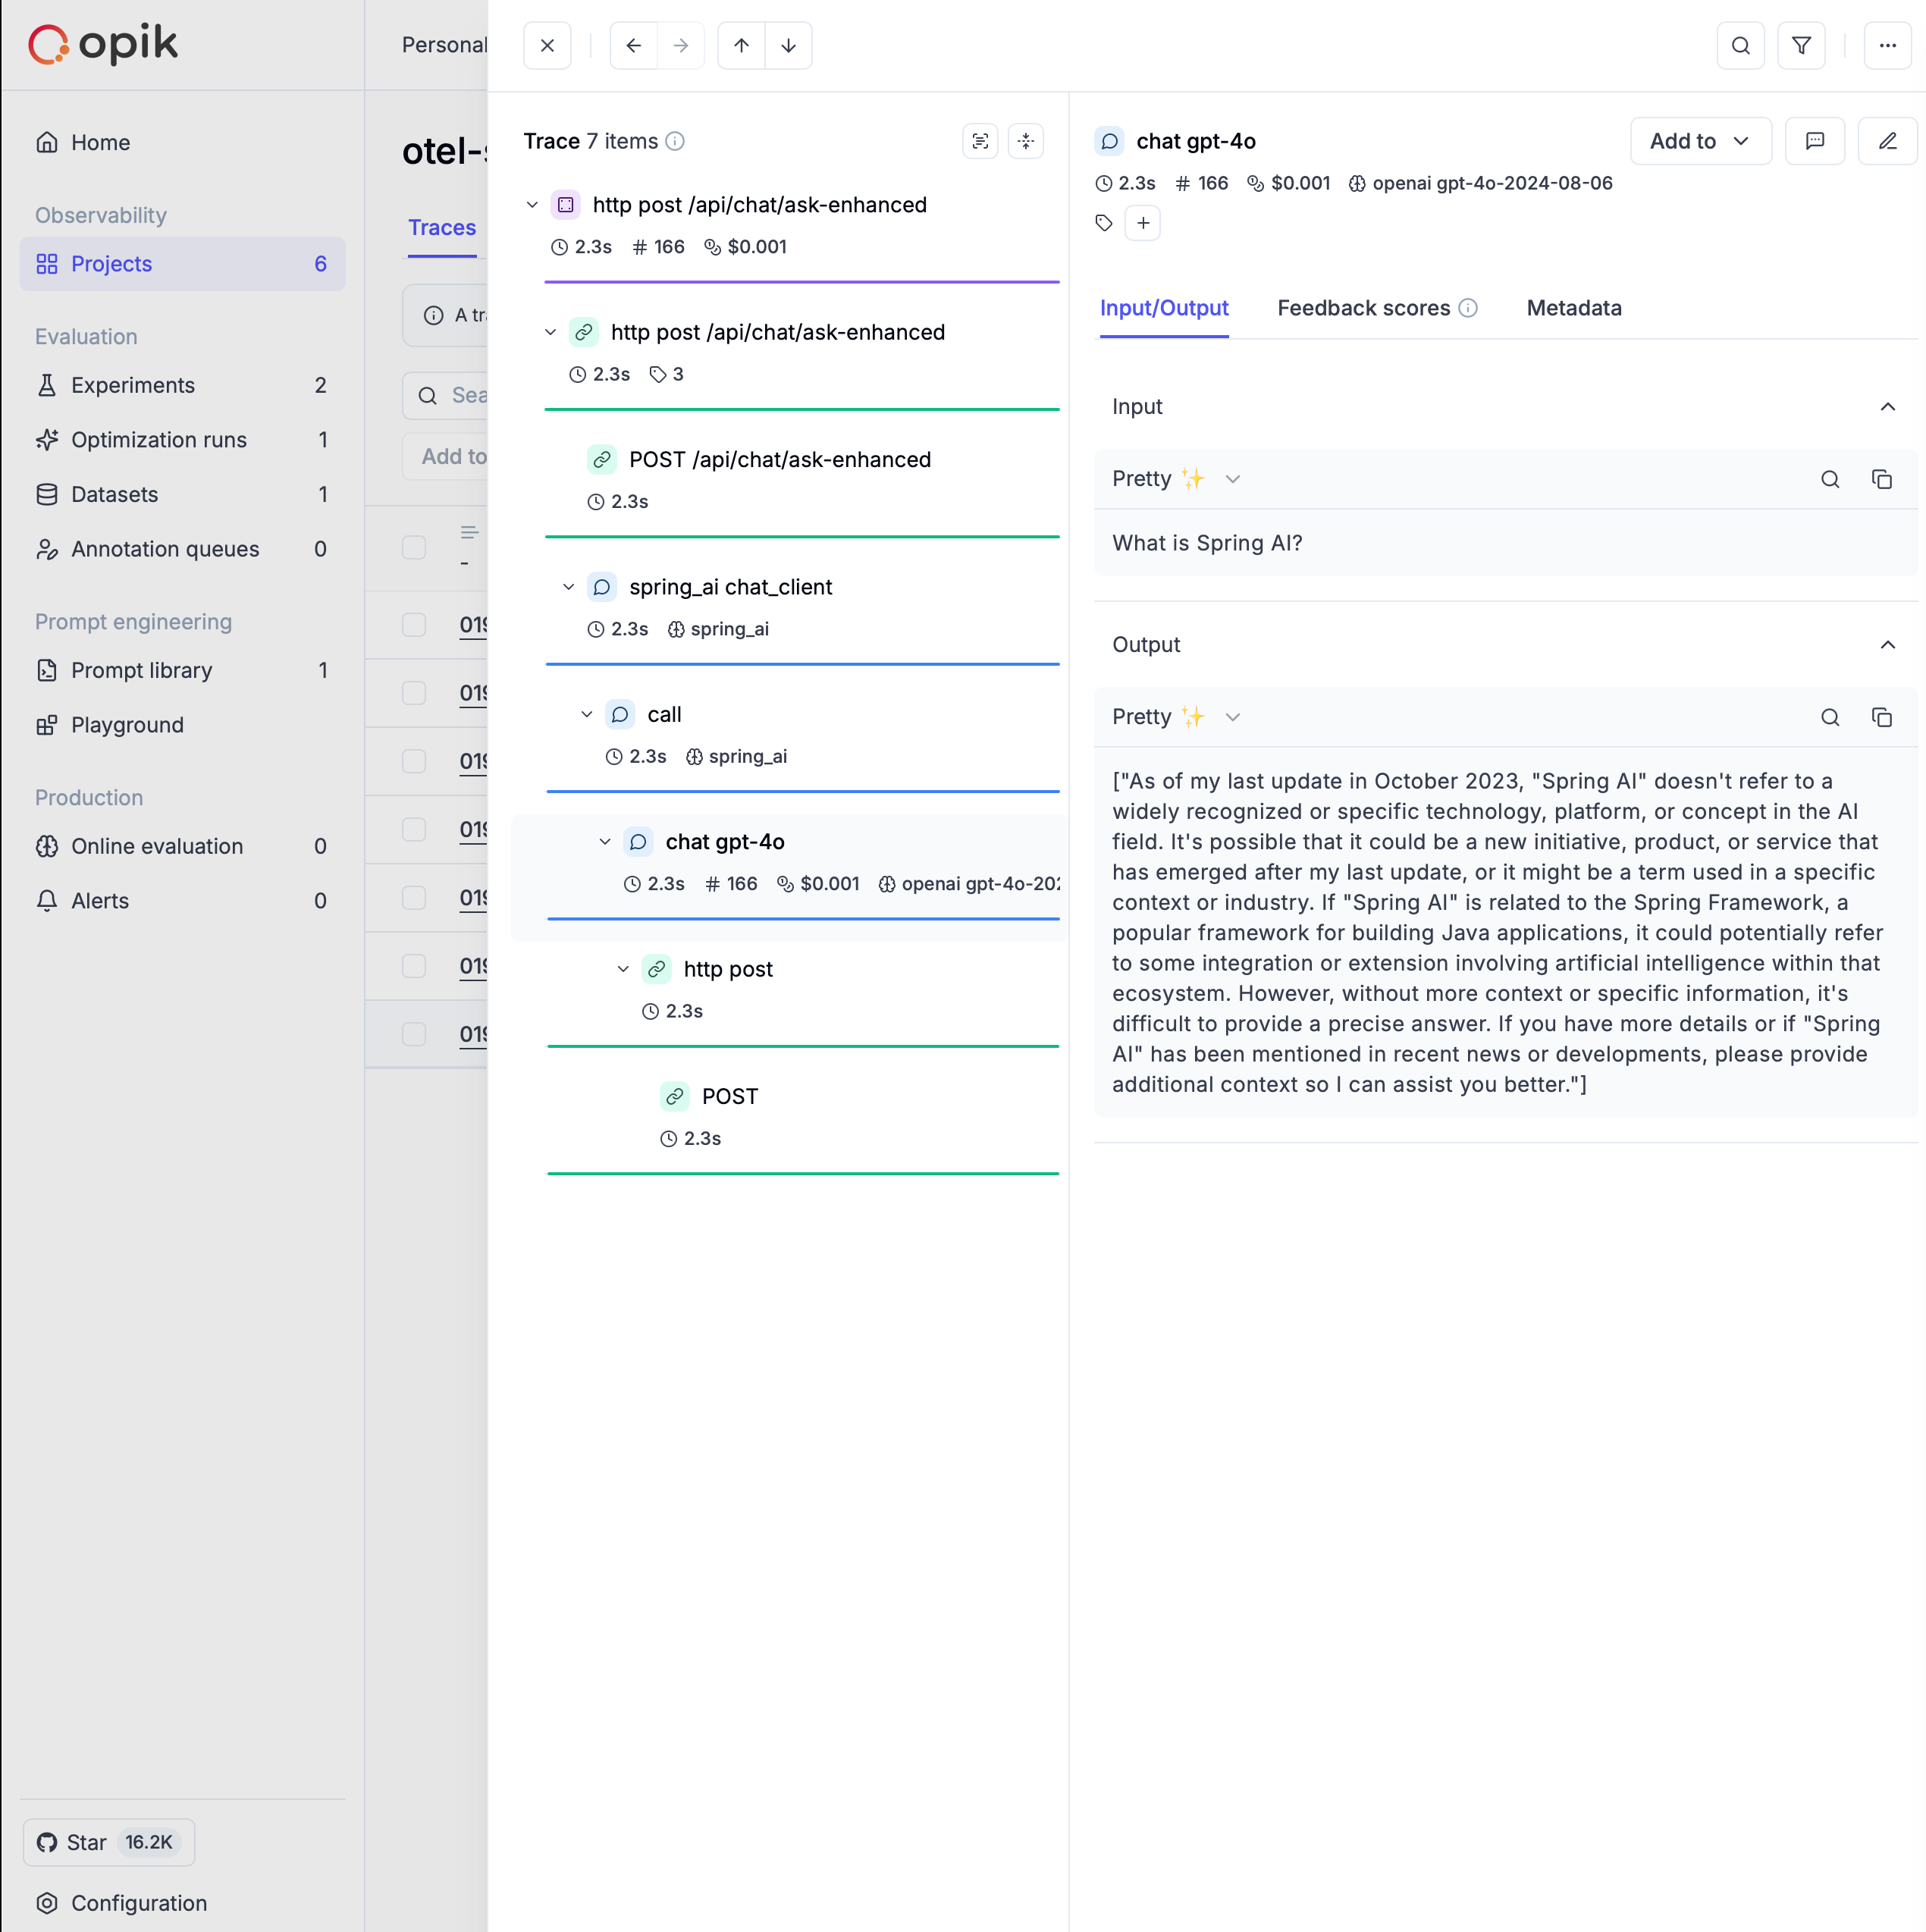
After running the demo application, you can view the traces in Opik by navigating to the Traces tab in the Projects page.
Further improvements
Section titled “Further improvements”If you have any questions or suggestions for improving the Spring AI integration, please open an issue on our GitHub repository.