
Text and chat prompts
The Prompt Library supports two prompt structures:
- Text prompts — Simple string templates with variable substitution. Good for one-shot generations.
- Chat prompts — Structured message lists in OpenAI format with system, user, and assistant roles. Good for multi-turn or system+user agents, and supports multimodal content (text, images, videos).
Text prompts
Section titled “Text prompts”A text prompt is a single string template with {{variable}} substitution. They are ideal for
single-turn interactions or when you need to generate a single piece of text.
Creating a text prompt
Section titled “Creating a text prompt”import opik
client = opik.Opik()
prompt = client.create_prompt(
name="prompt-summary",
prompt="Write a summary of the following text: {{text}}",
metadata={"environment": "development"},
project_name="my-agent",
)
# Render the template
print(prompt.format(text="Hello, world!"))import { Opik } from "opik";
const client = new Opik();
const prompt = await client.createPrompt({
name: "prompt-summary",
prompt: "Write a summary of the following text: {{text}}",
metadata: { environment: "development" },
projectName: "my-agent",
});
// Render the template
console.log(prompt?.format({ text: "Hello, world!" }));You can create a prompt in the UI by navigating to the Prompt library and clicking Create new prompt. This opens a dialog where you can enter the prompt name, the prompt text, and an optional description:
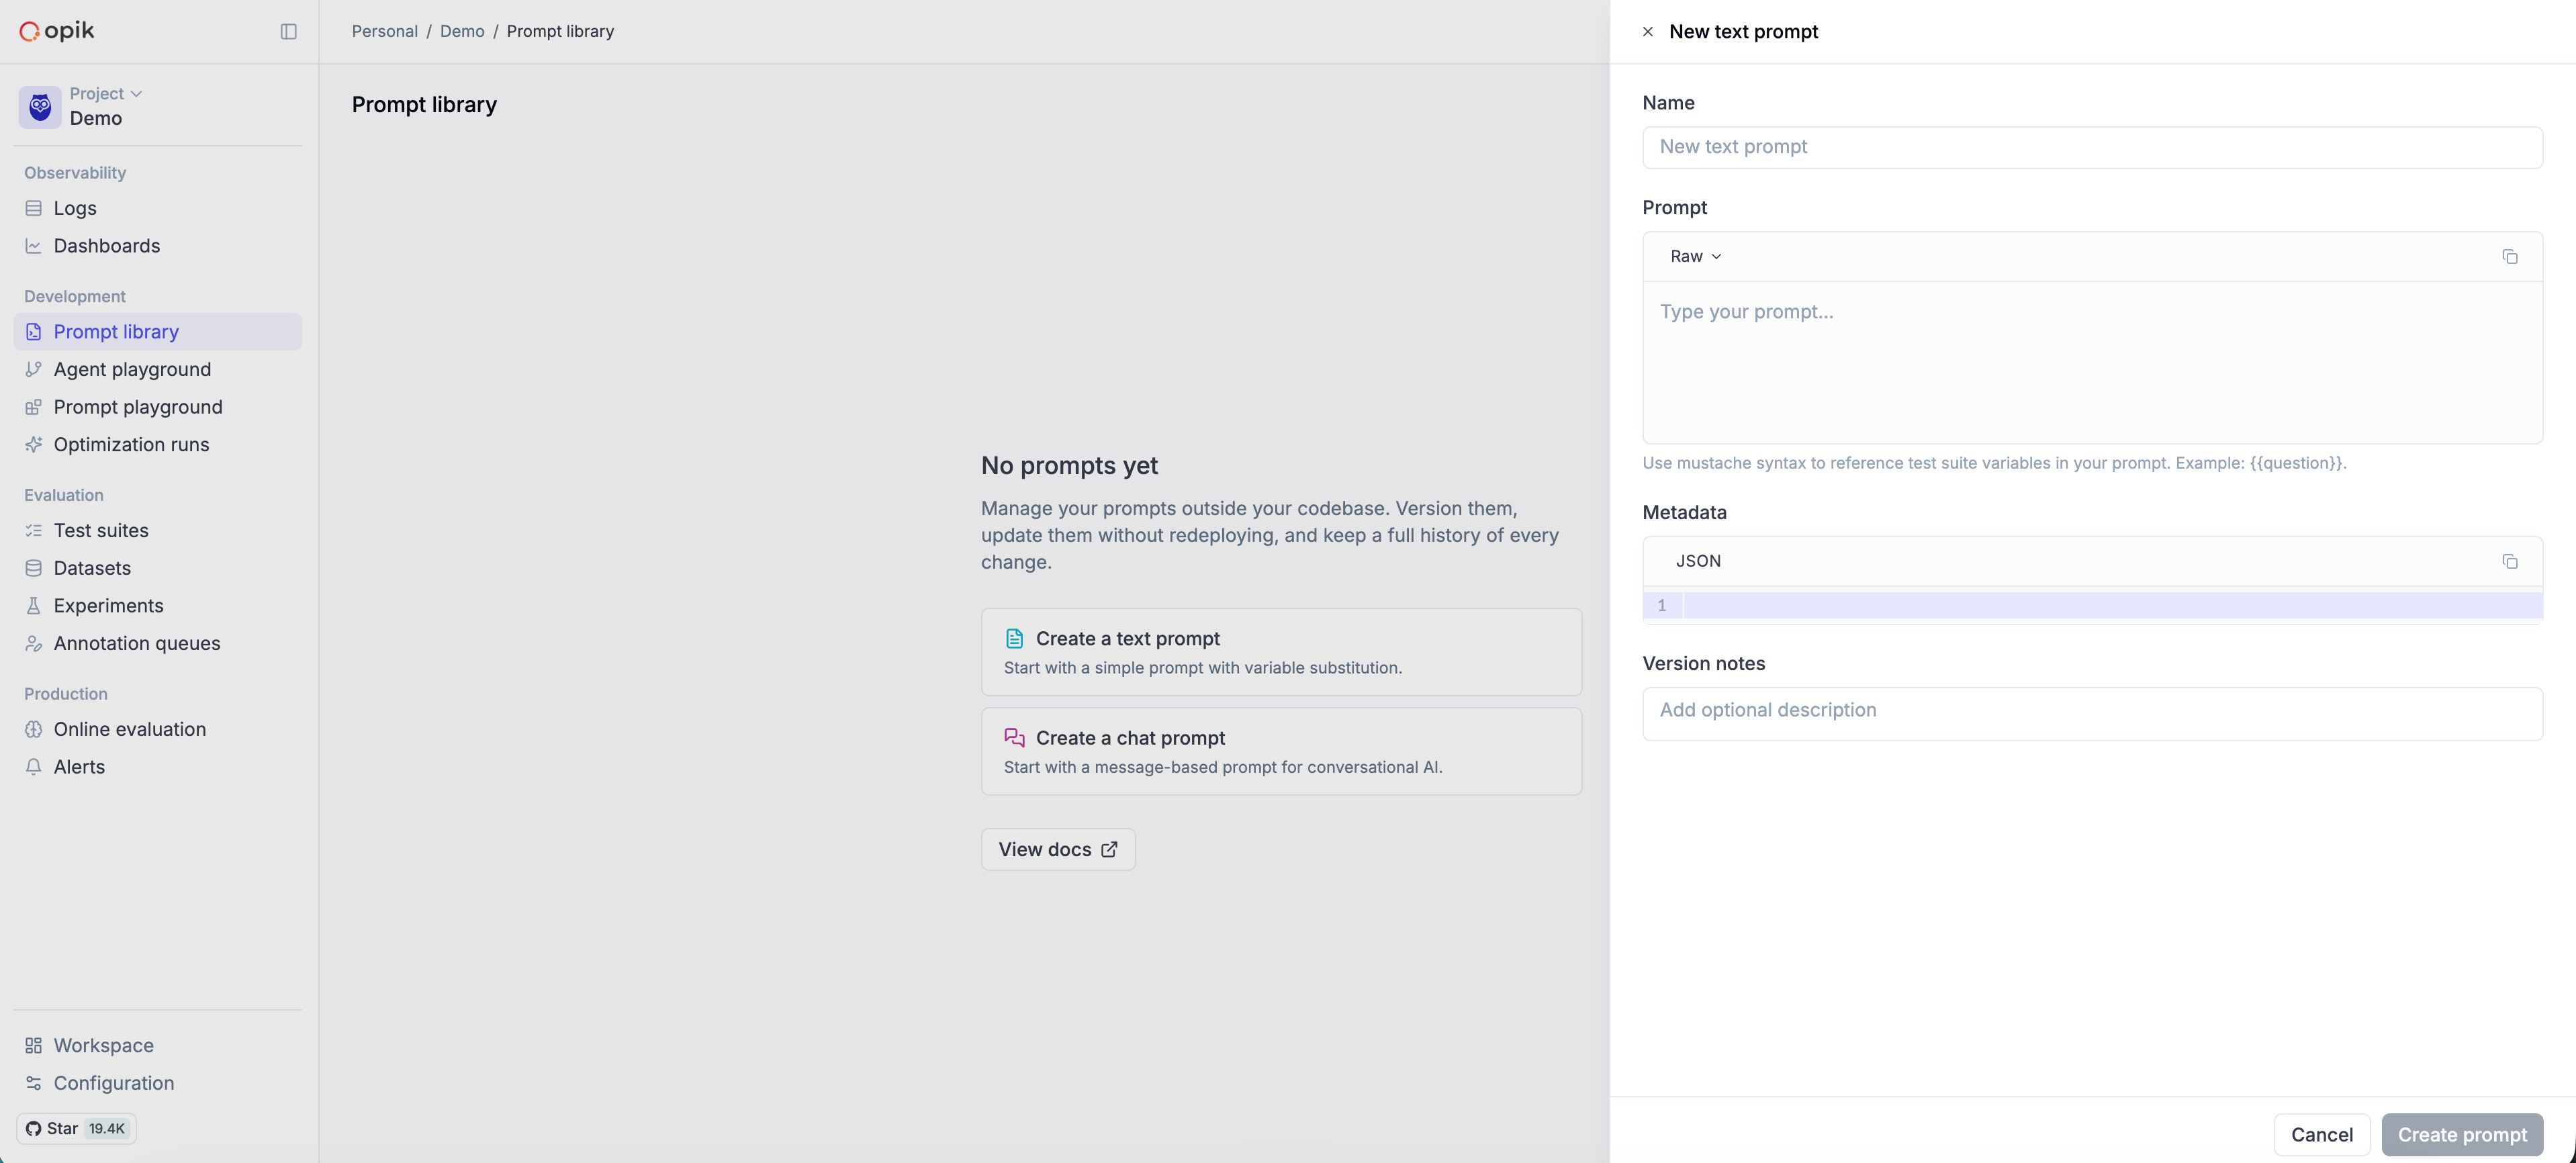
You can edit a prompt later by clicking on its name in the library and choosing Edit prompt.
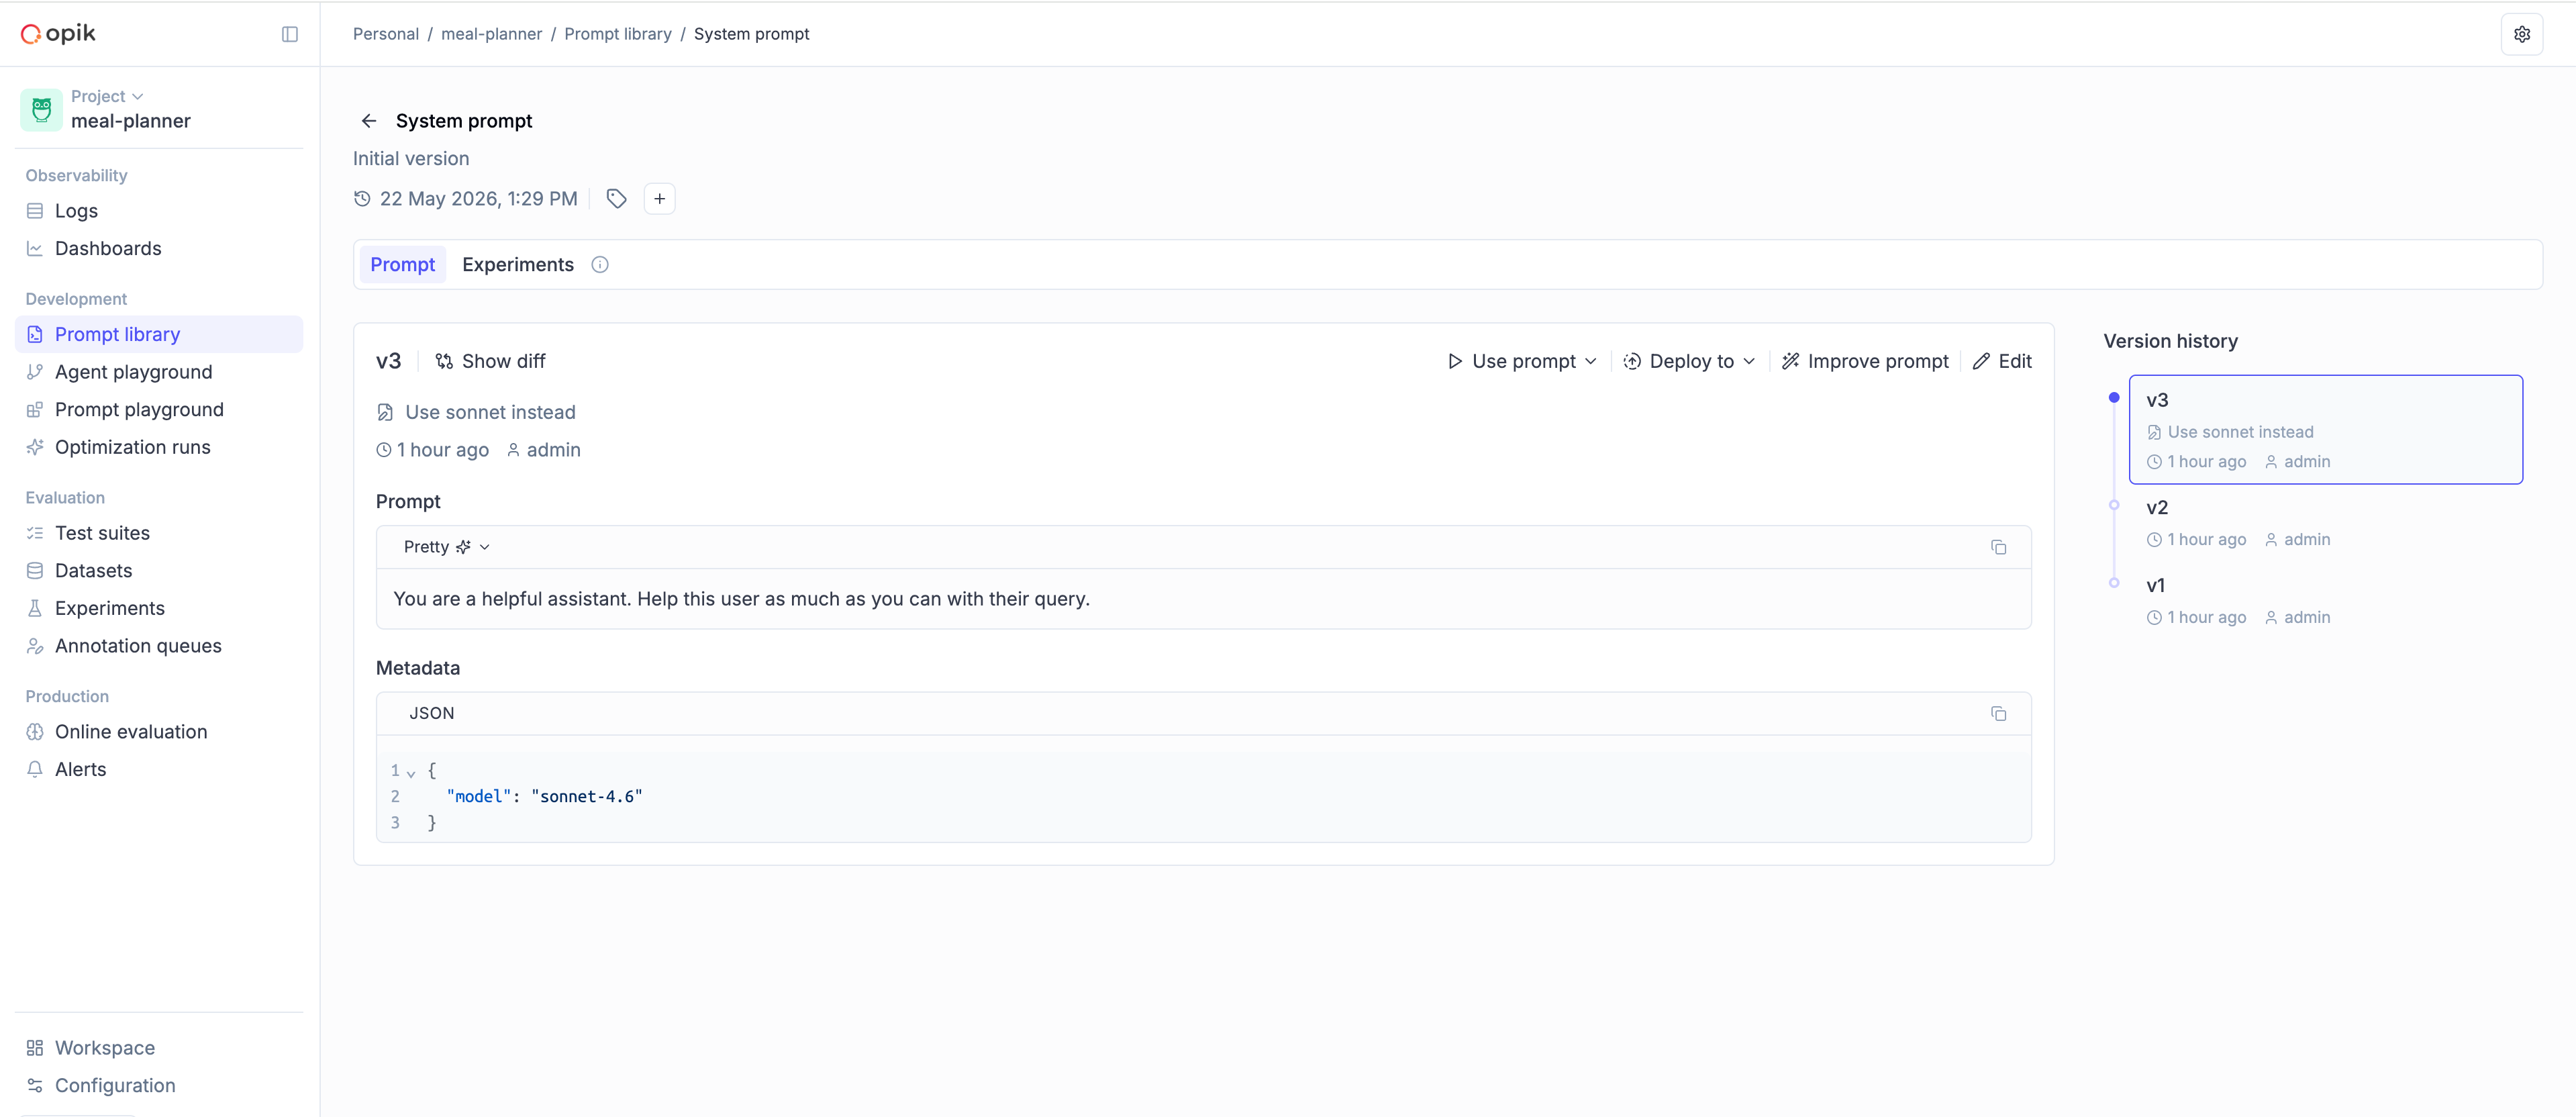
Each call with new content creates a new version, which is visible in the library:
Fetching a text prompt
Section titled “Fetching a text prompt”import opik
client = opik.Opik()
prompt = client.get_prompt(name="prompt-summary", project_name="my-agent")
# Render the template
print(prompt.format(text="Hello, world!"))import { Opik } from "opik";
const client = new Opik();
const prompt = await client.getPrompt({
name: "prompt-summary",
projectName: "my-agent",
});
if (prompt) {
console.log(prompt.format({ text: "Hello, world!" }));
}If you are not using the SDK, you can also fetch a prompt through the REST API.
Chat prompts
Section titled “Chat prompts”A chat prompt is a structured list of messages with roles (system, user, assistant), in
the same shape that OpenAI-compatible chat completion APIs accept. They are the right choice
when your agent has a multi-turn message structure.
Key features
Section titled “Key features”- Structured messages — Organize prompts as a list of messages with roles (system, user, assistant)
- Multimodal support — Include images, videos, and text in the same prompt
- Variable substitution — Use Mustache (
{{variable}}) or Jinja2 syntax - Version control — Automatic versioning when messages change
Creating a chat prompt
Section titled “Creating a chat prompt”import opik
client = opik.Opik()
messages = [
{"role": "system", "content": "You are a helpful assistant specializing in {{domain}}."},
{"role": "user", "content": "Explain {{topic}} in simple terms."},
]
chat_prompt = client.create_chat_prompt(
name="educational-assistant",
messages=messages,
metadata={"category": "education"},
project_name="my-agent",
)
# Render the messages with variables
formatted_messages = chat_prompt.format(
variables={
"domain": "physics",
"topic": "quantum entanglement",
}
)
print(formatted_messages)
# [
# {"role": "system", "content": "You are a helpful assistant specializing in physics."},
# {"role": "user", "content": "Explain quantum entanglement in simple terms."},
# ]import { Opik } from "opik";
const client = new Opik();
const messages = [
{
role: "system",
content: "You are a helpful assistant specializing in {{domain}}.",
},
{ role: "user", content: "Explain {{topic}} in simple terms." },
];
const chatPrompt = await client.createChatPrompt({
name: "educational-assistant",
messages,
metadata: { category: "education" },
projectName: "my-agent",
});
// Render the messages with variables
const formattedMessages = chatPrompt?.format({
domain: "physics",
topic: "quantum entanglement",
});
console.log(formattedMessages);
// [
// { role: "system", content: "You are a helpful assistant specializing in physics." },
// { role: "user", content: "Explain quantum entanglement in simple terms." },
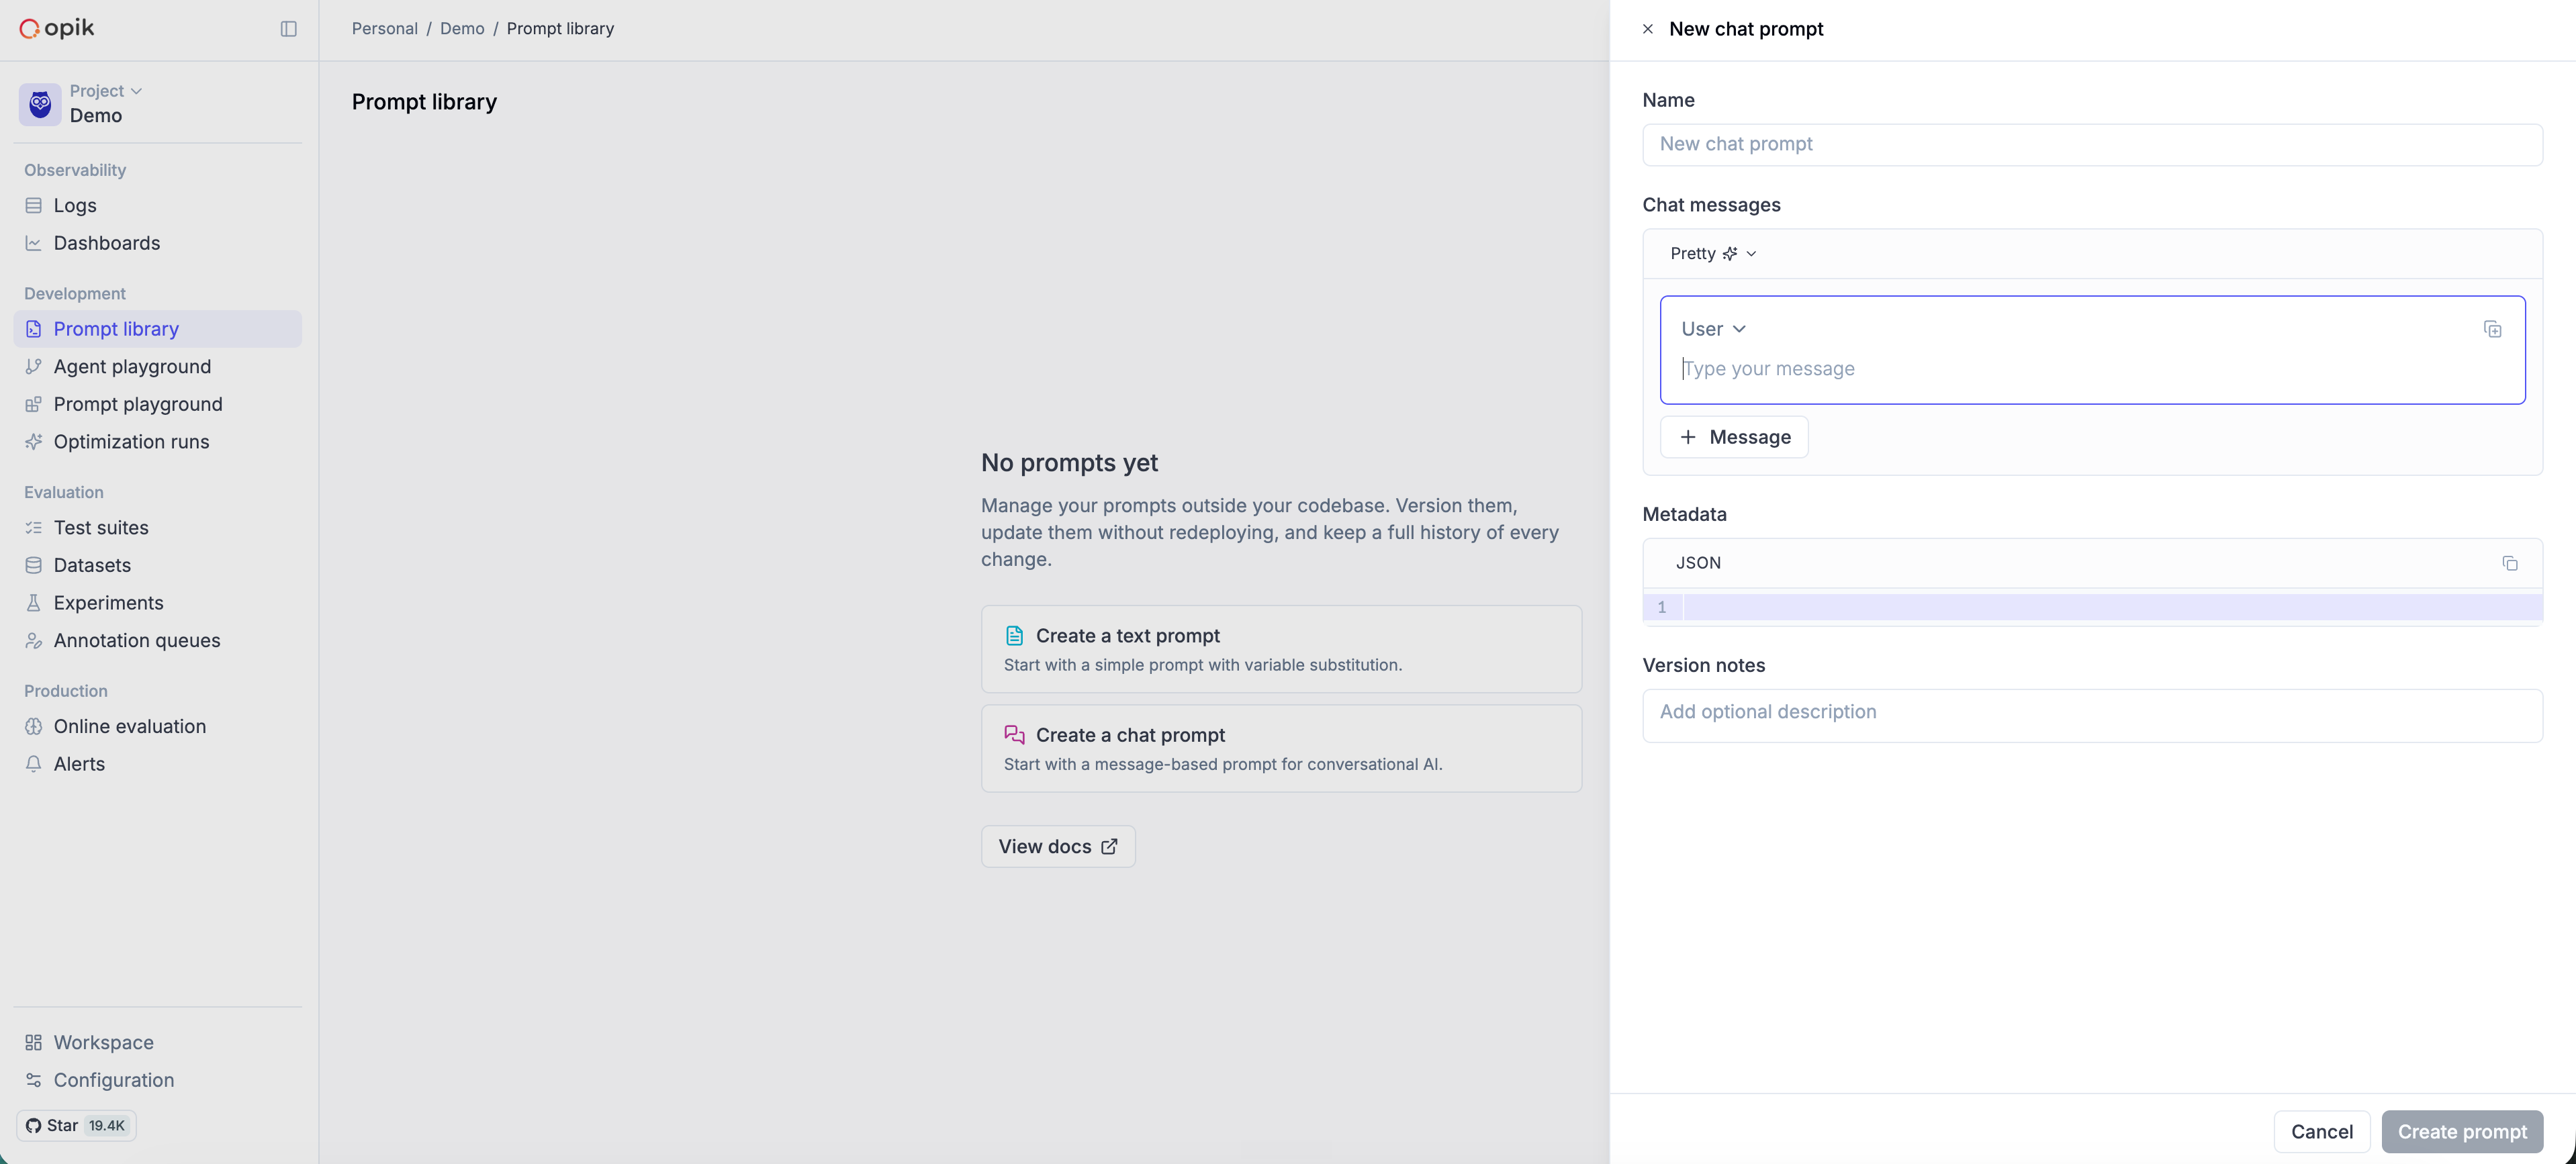
// ]To create a chat prompt in the UI, navigate to the Prompt Library and click Create new prompt. Select Chat prompt as the prompt type, then add your messages with their roles (system, user, assistant):
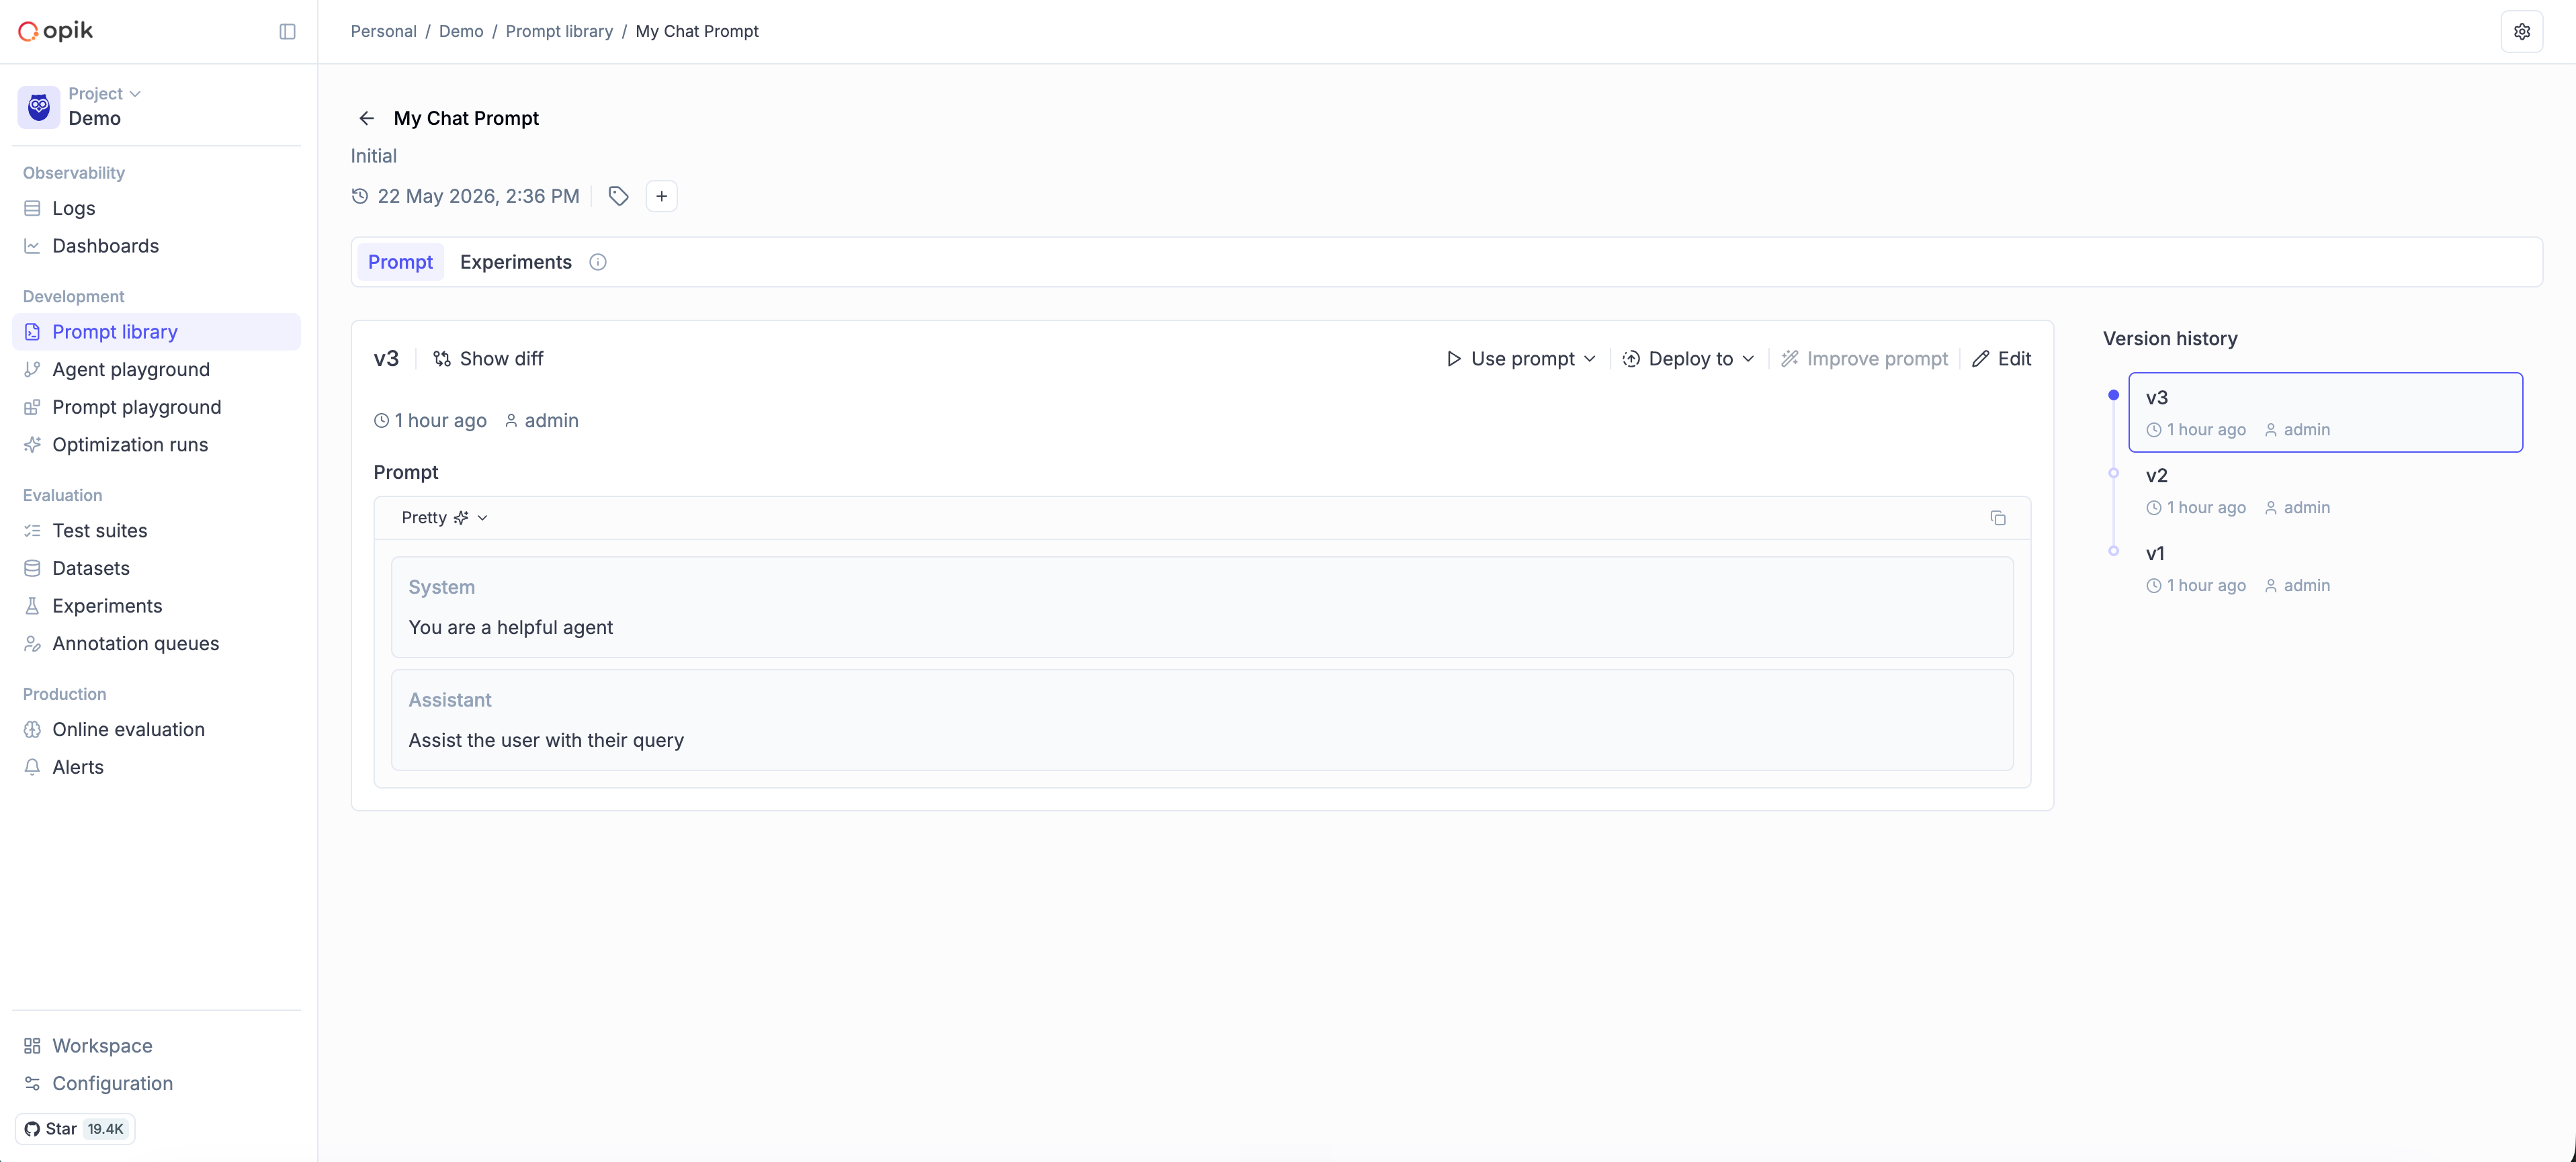
Once saved, a chat prompt has its own view in the Prompt Library:
Using chat prompts with the OpenAI API
Section titled “Using chat prompts with the OpenAI API”The output of chat_prompt.format() is already in the shape the OpenAI chat completion API
expects:
import opik
from openai import OpenAI

client = opik.Opik()
openai_client = OpenAI()

chat_prompt = client.get_chat_prompt(
    name="educational-assistant",
    project_name="my-agent",
)

formatted_messages = chat_prompt.format(
    variables={"domain": "physics", "topic": "quantum entanglement"},
)

response = openai_client.chat.completions.create(
    model="gpt-4o-mini",
    messages=formatted_messages,
)

print(response.choices[0].message.content)import { Opik } from "opik";
import OpenAI from "openai";
const client = new Opik();
const openai = new OpenAI();
const chatPrompt = await client.getChatPrompt({
name: "educational-assistant",
projectName: "my-agent",
});
const formattedMessages = chatPrompt?.format({
domain: "physics",
topic: "quantum entanglement",
});
const response = await openai.chat.completions.create({
model: "gpt-4o-mini",
messages: formattedMessages,
});
console.log(response.choices[0].message.content);Multi-turn templates
Section titled “Multi-turn templates”Chat prompts can capture a multi-turn flow, with assistant turns inline and variables anywhere in the conversation:
import opik

client = opik.Opik()

messages = [
    {"role": "system", "content": "You are a customer support agent for {{company}}."},
    {"role": "user", "content": "I have an issue with {{product}}."},
    {"role": "assistant", "content": "I'd be happy to help with your {{product}}. Can you describe the issue?"},
    {"role": "user", "content": "{{issue_description}}"},
]

chat_prompt = client.create_chat_prompt(
    name="customer-support-flow",
    messages=messages,
    project_name="my-agent",
)

formatted = chat_prompt.format(
    variables={
        "company": "Acme Corp",
        "product": "Widget Pro",
        "issue_description": "It won't turn on",
    }
)import { Opik } from "opik";
const client = new Opik();
const messages = [
{
role: "system",
content: "You are a customer support agent for {{company}}.",
},
{ role: "user", content: "I have an issue with {{product}}." },
{
role: "assistant",
content:
"I'd be happy to help with your {{product}}. Can you describe the issue?",
},
{ role: "user", content: "{{issue_description}}" },
];
const chatPrompt = await client.createChatPrompt({
name: "customer-support-flow",
messages,
projectName: "my-agent",
});
const formatted = chatPrompt?.format({
company: "Acme Corp",
product: "Widget Pro",
issue_description: "It won't turn on",
});Multimodal content
Section titled “Multimodal content”Chat prompts can include images and videos alongside text — useful for vision-enabled models.
Image analysis
Section titled “Image analysis”import opik
client = opik.Opik()
messages = [
{"role": "system", "content": "You analyze images and provide detailed descriptions."},
{
"role": "user",
"content": [
{"type": "text", "text": "What's in this image of {{subject}}?"},
{
"type": "image_url",
"image_url": {
"url": "{{image_url}}",
"detail": "high",
},
},
],
},
]
chat_prompt = client.create_chat_prompt(
name="image-analyzer",
messages=messages,
project_name="my-agent",
)
formatted = chat_prompt.format(
variables={
"subject": "a sunset",
"image_url": "https://example.com/sunset.jpg",
},
supported_modalities={"vision": True},
)import { Opik } from "opik";
const client = new Opik();
const messages = [
{
role: "system",
content: "You analyze images and provide detailed descriptions.",
},
{
role: "user",
content: [
{ type: "text", text: "What's in this image of {{subject}}?" },
{
type: "image_url",
image_url: {
url: "{{image_url}}",
detail: "high",
},
},
],
},
];
const chatPrompt = await client.createChatPrompt({
name: "image-analyzer",
messages,
projectName: "my-agent",
});
const formatted = chatPrompt?.format(
{
subject: "a sunset",
image_url: "https://example.com/sunset.jpg",
},
{ vision: true },
);Video analysis
Section titled “Video analysis”import opik
client = opik.Opik()
messages = [
{"role": "system", "content": "You analyze videos and provide insights."},
{
"role": "user",
"content": [
{"type": "text", "text": "Analyze this video: {{description}}"},
{
"type": "video_url",
"video_url": {
"url": "{{video_url}}",
"mime_type": "video/mp4",
},
},
],
},
]
chat_prompt = client.create_chat_prompt(
name="video-analyzer",
messages=messages,
project_name="my-agent",
)
formatted = chat_prompt.format(
variables={
"description": "traffic analysis",
"video_url": "https://example.com/traffic.mp4",
},
supported_modalities={"vision": True},
)import { Opik } from "opik";
const client = new Opik();
const messages = [
{
role: "system",
content: "You analyze videos and provide insights.",
},
{
role: "user",
content: [
{ type: "text", text: "Analyze this video: {{description}}" },
{
type: "video_url",
video_url: {
url: "{{video_url}}",
mime_type: "video/mp4",
},
},
],
},
];
const chatPrompt = await client.createChatPrompt({
name: "video-analyzer",
messages,
projectName: "my-agent",
});
const formatted = chatPrompt?.format(
{
description: "traffic analysis",
video_url: "https://example.com/traffic.mp4",
},
{ vision: true, video: true },
);Mixed content
Section titled “Mixed content”You can combine multiple content blocks in a single message — e.g. two images with text around them:
import opik

client = opik.Opik()

messages = [
    {
        "role": "user",
        "content": [
            {"type": "text", "text": "Compare these two images:"},
            {"type": "image_url", "image_url": {"url": "{{image1_url}}"}},
            {"type": "text", "text": "and"},
            {"type": "image_url", "image_url": {"url": "{{image2_url}}"}},
            {"type": "text", "text": "What are the main differences?"},
        ],
    },
]

chat_prompt = client.create_chat_prompt(
    name="image-comparison",
    messages=messages,
    project_name="my-agent",
)

formatted = chat_prompt.format(
    variables={
        "image1_url": "https://example.com/before.jpg",
        "image2_url": "https://example.com/after.jpg",
    },
    supported_modalities={"vision": True},
)import { Opik } from "opik";
const client = new Opik();
const messages = [
{
role: "user",
content: [
{ type: "text", text: "Compare these two images:" },
{ type: "image_url", image_url: { url: "{{image1_url}}" } },
{ type: "text", text: "and" },
{ type: "image_url", image_url: { url: "{{image2_url}}" } },
{ type: "text", text: "What are the main differences?" },
],
},
];
const chatPrompt = await client.createChatPrompt({
name: "image-comparison",
messages,
projectName: "my-agent",
});
const formatted = chatPrompt?.format(
{
image1_url: "https://example.com/before.jpg",
image2_url: "https://example.com/after.jpg",
},
{ vision: true },
);Template engines
Section titled “Template engines”Both text and chat prompts support two template engines for variable substitution:
Mustache (default)
Section titled “Mustache (default)”Mustache is simple, portable, and covers the common case of substituting variables into a template.
import opik
from opik.api_objects.prompt import PromptType

client = opik.Opik()

chat_prompt = client.create_chat_prompt(
    name="mustache-example",
    messages=[
        {"role": "user", "content": "Hello {{name}}, you live in {{city}}."},
    ],
    type=PromptType.MUSTACHE,  # Default
    project_name="my-agent",
)

formatted = chat_prompt.format(variables={"name": "Alice", "city": "Paris"})
# [{"role": "user", "content": "Hello Alice, you live in Paris."}]import { Opik, PromptType } from "opik";
const client = new Opik();
const chatPrompt = await client.createChatPrompt({
name: "mustache-example",
messages: [
{ role: "user", content: "Hello {{name}}, you live in {{city}}." },
],
type: PromptType.MUSTACHE, // Default
projectName: "my-agent",
});
const formatted = chatPrompt?.format({ name: "Alice", city: "Paris" });
// [{ role: "user", content: "Hello Alice, you live in Paris." }]Jinja2
Section titled “Jinja2”Jinja2 supports conditionals, loops, and filters, which makes it a better fit when your prompt needs to branch on input values.
import opik
from opik.api_objects.prompt import PromptType

client = opik.Opik()

chat_prompt = client.create_chat_prompt(
    name="jinja-example",
    messages=[
        {
            "role": "user",
            "content": """
            {% if is_premium %}
            Hello {{ name }}, welcome to our premium service!
            {% else %}
            Hello {{ name }}, welcome!
            {% endif %}
            """,
        },
    ],
    type=PromptType.JINJA2,
    project_name="my-agent",
)

# Premium user
chat_prompt.format(variables={"name": "Alice", "is_premium": True})
# Regular user
chat_prompt.format(variables={"name": "Bob", "is_premium": False})import { Opik, PromptType } from "opik";
const client = new Opik();
const chatPrompt = await client.createChatPrompt({
name: "jinja-example",
messages: [
{
role: "user",
content: `
{% if is_premium %}
Hello {{ name }}, welcome to our premium service!
{% else %}
Hello {{ name }}, welcome!
{% endif %}
`,
},
],
type: PromptType.JINJA2,
projectName: "my-agent",
});
// Premium user
chatPrompt?.format({ name: "Alice", is_premium: true });
// Regular user
chatPrompt?.format({ name: "Bob", is_premium: false });Searching prompts
Section titled “Searching prompts”To discover prompts by name substring or filter expression, use search_prompts /
searchPrompts. Filters use Opik Query Language (OQL), the same syntax used elsewhere in Opik:
import opik

client = opik.Opik()

# Search by name substring
summaries = client.search_prompts(
    filter_string='name contains "summary"'
)

# Combine name + tags
filtered = client.search_prompts(
    filter_string='name contains "summary" AND tags contains "alpha" AND tags contains "beta"',
)

# Only text prompts
text_prompts = client.search_prompts(
    filter_string='template_structure = "text"'
)

# Only chat prompts
chat_prompts = client.search_prompts(
    filter_string='template_structure = "chat" AND name contains "assistant"'
)

for prompt in filtered:
print(prompt.name, prompt.version, prompt.prompt)import { Opik } from "opik";
const client = new Opik();
// Search by name substring
const summaries = await client.searchPrompts(
'name contains "summary"'
);
// Combine name + tags
const filtered = await client.searchPrompts(
'name contains "summary" AND tags contains "alpha" AND tags contains "beta"'
);
// Only text prompts
const textPrompts = await client.searchPrompts(
'template_structure = "text"'
);
// Only chat prompts
const chatPrompts = await client.searchPrompts(
'template_structure = "chat" AND name contains "assistant"'
);
for (const prompt of filtered) {
console.log(prompt.name, prompt.version, prompt.prompt);
}search_prompts returns the latest version for each matching prompt. To explore the full
version history of a single prompt, see Version control.
Filter syntax
Section titled “Filter syntax”The filter_string parameter takes one or more <column> <operator> <value> clauses joined
with AND:
| Column | Type | Operators |
|---|---|---|
id |
String | =, !=, contains, not_contains, starts_with, ends_with, >, < |
name |
String | =, !=, contains, not_contains, starts_with, ends_with, >, < |
created_by |
String | =, !=, contains, not_contains, starts_with, ends_with, >, < |
tags |
List | contains |
template_structure |
String | =, != (values: "text", "chat") |
Examples:
tags contains "production"— Filter by tagname contains "summary"— Filter by name substringcreated_by = "user@example.com"— Filter by creatortags contains "alpha" AND tags contains "beta"— Multiple tag filtering (AND)template_structure = "text"— Only text promptstemplate_structure = "chat"— Only chat prompts