
SDK configuration
This guide covers configuration for both Python and TypeScript SDKs, including basic setup, advanced options, and debugging capabilities.
Getting Started
Section titled “Getting Started”Python SDK
Section titled “Python SDK”The recommended approach to configuring the Python SDK is to use the opik configure command. This will prompt you to set up your API key and Opik instance URL (if applicable) to ensure proper routing and authentication. All details will be saved to a configuration file.
If you are using the Cloud version of the platform, you can configure the SDK by running:
import opik

opik.configure(use_local=False)
You can also configure the SDK by calling configure from the Command line:
opik configureIf you are self-hosting the platform, you can configure the SDK by running:
import opik

opik.configure(use_local=True)
or from the Command line:
opik configure --use_localThe configure methods will prompt you for the necessary information and save it to a configuration file (~/.opik.config). When using the command line version, you can use the -y or --yes flag to automatically approve any confirmation prompts:
opik configure --yesConnecting your AI coding assistant
Section titled “Connecting your AI coding assistant”The one-command path is uvx opik mcp configure, which needs no SDK; see
Opik's MCP server. If you are already running opik configure, it
offers the same step at the end: registering the MCP server with the AI clients it
finds on your machine, so your assistant can read traces and log scores directly
from the chat.
Pass --install-mcp to skip the prompt and register it:
opik configure --install-mcpopik configure also offers the Opik skill pack, which teaches your assistant
how to instrument code, run test suites, and use opik connect.
--install-skills installs it without the prompt:
opik configure --install-mcp --install-skillsTo set this up without re-running the whole configuration, use uvx opik mcp configure. See Opik's MCP server for the --ai-client flag, the skill pack, and per-client instructions.
TypeScript SDK
Section titled “TypeScript SDK”For the TypeScript SDK, configuration is done through environment variables, constructor options, or configuration files.
Installation:
npm install opikBasic Configuration:
You can configure the Opik client using environment variables in a .env file:
OPIK_API_KEY="your-api-key"
OPIK_URL_OVERRIDE="https://www.comet.com/opik/api"
OPIK_PROJECT_NAME="your-project-name"
OPIK_WORKSPACE="your-workspace-name"
Or pass configuration directly to the constructor:
import { Opik } from "opik";

const client = new Opik({
  apiKey: "<your-api-key>",
  apiUrl: "https://www.comet.com/opik/api",
  projectName: "<your-project-name>",
  workspaceName: "<your-workspace-name>",
});
Configuration Methods
Section titled “Configuration Methods”Both SDKs support multiple configuration approaches with different precedence orders.
Configuration Precedence
Section titled “Configuration Precedence”Python SDK: Constructor options → Environment variables → Configuration file → Defaults
TypeScript SDK: Constructor options → Environment variables → Configuration file (~/.opik.config) → Defaults
Environment Variables
Section titled “Environment Variables”Both SDKs support environment variables for configuration. Here's a comparison of available options:
| Configuration | Python Env Variable | TypeScript Env Variable | Description |
|---|---|---|---|
| API Key | OPIK_API_KEY |
OPIK_API_KEY |
API key for Opik Cloud |
| URL Override | OPIK_URL_OVERRIDE |
OPIK_URL_OVERRIDE |
Opik server URL |
| Project Name | OPIK_PROJECT_NAME |
OPIK_PROJECT_NAME |
Project name |
| Environment | OPIK_ENVIRONMENT |
OPIK_ENVIRONMENT |
Default environment tag for traces |
| Workspace | OPIK_WORKSPACE |
OPIK_WORKSPACE |
Workspace name |
| Config Path | OPIK_CONFIG_PATH |
OPIK_CONFIG_PATH |
Custom config file location |
| Default LLM | OPIK_DEFAULT_LLM |
N/A | Default model used by Python evaluation/simulation helpers |
| Track Disable | OPIK_TRACK_DISABLE |
OPIK_TRACK_DISABLE |
Disable tracing of traces and spans |
| Flush Timeout | OPIK_DEFAULT_FLUSH_TIMEOUT |
N/A | Default flush timeout (Python only) |
| TLS Certificate | OPIK_CHECK_TLS_CERTIFICATE |
N/A | Check TLS certificates (Python only) |
| Suppress Batching Warning | OPIK_SUPPRESS_BATCHING_UPDATE_WARNING |
N/A | Suppress the batching update warning (Python only) |
| Prompt Cache TTL | OPIK_PROMPT_CACHE_TTL_SECONDS |
N/A | TTL in seconds for cached prompts (Python only) |
| Analytics Enable | OPIK_ANALYTICS_ENABLE |
N/A | Send SDK usage analytics (Python only) |
| Batch Delay | N/A | OPIK_BATCH_DELAY_MS |
Batching delay in ms (TypeScript only) |
| Hold Until Flush | N/A | OPIK_HOLD_UNTIL_FLUSH |
Hold data until manual flush (TypeScript only) |
| Console Log Level | OPIK_CONSOLE_LOGGING_LEVEL |
N/A | Console log level (Python only) |
| File Log Level | OPIK_FILE_LOGGING_LEVEL |
N/A | File log level (Python only) |
| Optimizer Log Level | OPIK_OPTIMIZER_LOG_LEVEL |
N/A | Opik Optimizer SDK log level (Python only) |
| Log Level | N/A | OPIK_LOG_LEVEL |
Logging level (TypeScript only) |
Using .env Files
Section titled “Using .env Files”Both SDKs support .env files for managing environment variables. This is a good practice to avoid hardcoding secrets and to make your configuration more portable.
For Python projects, install python-dotenv:
pip install python-dotenvFor TypeScript projects, dotenv is automatically loaded by the SDK.
Create a .env file in your project's root directory:
# Opik Configuration
OPIK_API_KEY="YOUR_OPIK_API_KEY"
OPIK_URL_OVERRIDE="https://www.comet.com/opik/api"
OPIK_PROJECT_NAME="your-project-name"
OPIK_WORKSPACE="your-workspace-name"
OPIK_DEFAULT_LLM="openai/gpt-5-nano"

# LLM Provider API Keys (if needed)
OPENAI_API_KEY="YOUR_OPENAI_API_KEY"

# Logging Configuration (see Debug Mode and Logging section below)
OPIK_CONSOLE_LOGGING_LEVEL="WARNING"  # Python: Control console output (DEBUG, INFO, WARNING, ERROR, CRITICAL)
OPIK_FILE_LOGGING_LEVEL="DEBUG"       # Python: Enable file logging
OPIK_LOG_LEVEL="DEBUG"                # TypeScript: Control log level
Python usage with .env file:
from dotenv import load_dotenv

load_dotenv()  # Load before importing opik

import opik

# Your Opik code here
TypeScript usage with .env file:
The TypeScript SDK automatically loads .env files, so no additional setup is required:
import { Opik } from "opik";

// Configuration is automatically loaded from .env
const client = new Opik();
Using Configuration Files
Section titled “Using Configuration Files”Both SDKs support configuration files for persistent settings.
Python SDK Configuration File
Section titled “Python SDK Configuration File”The Python SDK uses the TOML format. The configure method creates this file automatically, but you can also create it manually:
[opik]
url_override = https://www.comet.com/opik/api
api_key = <API Key>
workspace = <Workspace name>
project_name = <Project Name>[opik]
url_override = http://localhost:5173/api
workspace = default
project_name = <Project Name>TypeScript SDK Configuration File
Section titled “TypeScript SDK Configuration File”The TypeScript SDK also supports the same ~/.opik.config file format as the Python SDK. The configuration file uses INI format internally but shares the same structure:
[opik]
url_override = https://www.comet.com/opik/api
api_key = <API Key>
workspace = <Workspace name>
project_name = <Project Name>[opik]
url_override = http://localhost:5173/api
workspace = default
project_name = <Project Name>Debug Mode and Logging
Section titled “Debug Mode and Logging”Both SDKs provide debug capabilities for troubleshooting integration issues.
Python SDK Logging
Section titled “Python SDK Logging”The Python SDK provides two separate logging channels that can be configured independently:
- Console Logging: Controls log output to the console (stdout/stderr)
- File Logging: Controls log output to a file
Both channels support the following log levels: DEBUG, INFO (default), WARNING, ERROR, CRITICAL
Controlling Console Logging
Section titled “Controlling Console Logging”To control the console log level, set the OPIK_CONSOLE_LOGGING_LEVEL environment variable before importing opik:
# Reduce console output to warnings and errors only
export OPIK_CONSOLE_LOGGING_LEVEL="WARNING"
Available log levels for console:
DEBUG: Show all debug informationINFO: Show informational messages (default)WARNING: Show only warnings and errorsERROR: Show only errors and critical messagesCRITICAL: Show only critical errors
Using with .env file:
# Console Logging (reduce noise)
OPIK_CONSOLE_LOGGING_LEVEL="WARNING"Enabling File Logging for Debug
Section titled “Enabling File Logging for Debug”To enable debug mode with file logging, set these environment variables before importing opik:
export OPIK_FILE_LOGGING_LEVEL="DEBUG"
export OPIK_LOGGING_FILE=".tmp/opik-debug-$(date +%Y%m%d).log"
Using with .env file:
# File Logging (for debug)
OPIK_FILE_LOGGING_LEVEL="DEBUG"
OPIK_LOGGING_FILE=".tmp/opik-debug.log"
Example combining both console and file logging:
# Opik Logging Configuration

# Console: Show only warnings and errors
OPIK_CONSOLE_LOGGING_LEVEL="WARNING"

# File: Log everything for debugging
OPIK_FILE_LOGGING_LEVEL="DEBUG"
OPIK_LOGGING_FILE=".tmp/opik-debug.log"
Then in your Python script:
from dotenv import load_dotenv

load_dotenv()  # Load before importing opik

import opik

# Your Opik code here - console will be quiet, debug logs go to file
TypeScript SDK Debug Mode
Section titled “TypeScript SDK Debug Mode”The TypeScript SDK uses structured logging with configurable levels:
Available log levels: SILLY, TRACE, DEBUG, INFO (default), WARN, ERROR, FATAL
Enable debug logging:
export OPIK_LOG_LEVEL="DEBUG"Or in .env file:
OPIK_LOG_LEVEL="DEBUG"Programmatic control:
import { setLoggerLevel, disableLogger } from "opik";

// Set log level
setLoggerLevel("DEBUG");

// Disable logging entirely
disableLogger();
Advanced Configuration
Section titled “Advanced Configuration”Python SDK Advanced Options
Section titled “Python SDK Advanced Options”HTTP Client Configuration
Section titled “HTTP Client Configuration”The Opik Python SDK uses the httpx library to make HTTP requests. The default configuration applied to the HTTP client is suitable for most use cases, but you can customize it by registering a custom httpx client hook as in following example:
import opik.hooks

def custom_auth_client_hook(client: httpx.Client) -> None:
    client.auth = CustomAuth()

hook = opik.hooks.HttpxClientHook(
    client_init_arguments={"trust_env": False},
    client_modifier=custom_auth_client_hook,
)
opik.hooks.add_httpx_client_hook(hook)

# Use the Opik SDK as usual
Make sure to add the hook before using the Opik SDK.
TypeScript SDK Advanced Options
Section titled “TypeScript SDK Advanced Options”Batching Configuration
Section titled “Batching Configuration”The TypeScript SDK uses batching for optimal performance. You can configure batching behavior:
import { Opik } from "opik";

const client = new Opik({
  // Custom batching delay (default: 300ms)
  batchDelayMs: 1000,

  // Hold data until manual flush (default: false)
  holdUntilFlush: true,

  // Custom headers
  headers: {
    "Custom-Header": "value",
  },
});

// Manual flushing
await client.flush();
Global Flush Control
Section titled “Global Flush Control”import { flushAll } from "opik";
// Flush all instantiated clients
await flushAll();Usage analytics
Section titled “Usage analytics”The Python SDK reports usage analytics that tell us which SDK features are being used, so we know what to invest in. Each API you call is reported once per run, by name only, alongside the same environment details the SDK already reports with error reports: the SDK and Python versions, the OS, whether you are in Jupyter, Colab or CI, the kind of installation (cloud, self-hosted or local), and the versions of the LLM libraries installed next to Opik.
Usage is attributed to your workspace name — the same identifier used for error reporting, so that an error and the usage around it describe the same user. Installations left on the default workspace are attributed to a one-way hash of the hostname and username instead.
Never sent: the contents of your traces, spans, prompts, datasets or evaluation results, your API key, or your project names. Reporting always happens on a background thread and never affects your application.
Events are sent to Comet's usage-reporting endpoint, the same pipeline the Opik UI and backend already report through.
To turn it off:
export OPIK_ANALYTICS_ENABLE=falseConfiguration Reference
Section titled “Configuration Reference”Python SDK Configuration Values
Section titled “Python SDK Configuration Values”| Configuration Name | Environment Variable | Description |
|---|---|---|
| url_override | OPIK_URL_OVERRIDE |
The URL of the Opik server - Defaults to https://www.comet.com/opik/api |
| api_key | OPIK_API_KEY |
The API key - Only required for Opik Cloud |
| workspace | OPIK_WORKSPACE |
The workspace name - Optional |
| project_name | OPIK_PROJECT_NAME |
The project name to use |
| N/A | OPIK_ENVIRONMENT |
Default environment tag attached to traces (e.g. production, staging) |
| N/A | OPIK_DEFAULT_LLM |
Default LLM used by Python evaluation/simulation helpers - Defaults to openai/gpt-5-nano |
| opik_track_disable | OPIK_TRACK_DISABLE |
Disable tracking of traces and spans - Defaults to false |
| default_flush_timeout | OPIK_DEFAULT_FLUSH_TIMEOUT |
Default flush timeout - Defaults to no timeout |
| opik_check_tls_certificate | OPIK_CHECK_TLS_CERTIFICATE |
Check TLS certificate - Defaults to true |
| console_logging_level | OPIK_CONSOLE_LOGGING_LEVEL |
Console logging level - Defaults to INFO |
| file_logging_level | OPIK_FILE_LOGGING_LEVEL |
File logging level - Not configured by default |
| logging_file | OPIK_LOGGING_FILE |
File to write logs to - Defaults to opik.log |
| suppress_batching_update_warning | OPIK_SUPPRESS_BATCHING_UPDATE_WARNING |
Suppress the warning about potential data loss when calling .end() or .update() on spans or traces with batching enabled - Defaults to false |
| prompt_cache_ttl_seconds | OPIK_PROMPT_CACHE_TTL_SECONDS |
How long, in seconds, unpinned prompts are cached before they are refreshed from the backend - Defaults to 300 |
| analytics_enable | OPIK_ANALYTICS_ENABLE |
Send usage analytics about which SDK features are used - Defaults to true. See Usage analytics |
TypeScript SDK Configuration Values
Section titled “TypeScript SDK Configuration Values”| Configuration Name | Environment Variable | Description |
|---|---|---|
| apiUrl | OPIK_URL_OVERRIDE |
The URL of the Opik server - Defaults to http://localhost:5173/api |
| apiKey | OPIK_API_KEY |
The API key - Required for Opik Cloud |
| workspaceName | OPIK_WORKSPACE |
The workspace name - Optional |
| projectName | OPIK_PROJECT_NAME |
The project name - Defaults to Default Project |
| environment | OPIK_ENVIRONMENT |
Default environment tag for traces - Optional |
| batchDelayMs | OPIK_BATCH_DELAY_MS |
Batching delay in milliseconds - Defaults to 300 |
| holdUntilFlush | OPIK_HOLD_UNTIL_FLUSH |
Hold data until manual flush - Defaults to false |
| trackDisable | OPIK_TRACK_DISABLE |
Disable tracing of traces and spans - Defaults to false |
| N/A | OPIK_LOG_LEVEL |
Logging level - Defaults to INFO |
| N/A | OPIK_CONFIG_PATH |
Custom config file location |
Troubleshooting
Section titled “Troubleshooting”Python SDK Troubleshooting
Section titled “Python SDK Troubleshooting”SSL Certificate Error
Section titled “SSL Certificate Error”If you encounter the following error:
[SSL: CERTIFICATE_VERIFY_FAILED] certificate verify failed: self-signed certificate in certificate chain (_ssl.c:1006)You can resolve it by either:
- Disable the TLS certificate check by setting the
OPIK_CHECK_TLS_CERTIFICATEenvironment variable tofalse - Add the Opik server's certificate to your trusted certificates by setting the
REQUESTS_CA_BUNDLEenvironment variable
Health Check Command
Section titled “Health Check Command”If you are experiencing problems with the Python SDK, such as receiving 400 or 500 errors from the backend, or being unable to connect at all, run the health check command:
opik healthcheckThis command will analyze your configuration and backend connectivity, providing useful insights into potential issues.
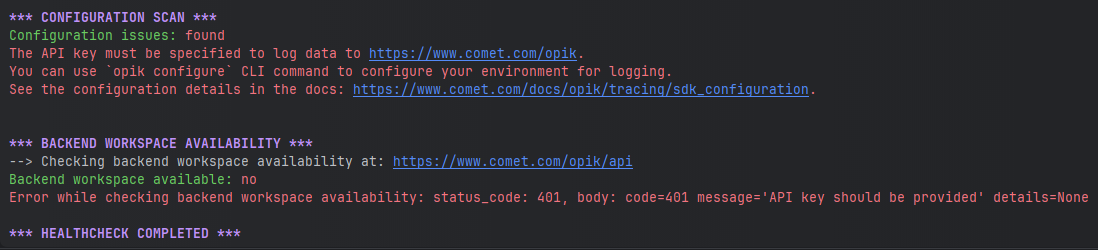
Reviewing the health check output can help pinpoint the source of the problem and suggest possible resolutions.
TypeScript SDK Troubleshooting
Section titled “TypeScript SDK Troubleshooting”Configuration Validation Errors
Section titled “Configuration Validation Errors”The TypeScript SDK validates configuration at startup. Common errors:
- "OPIK_URL_OVERRIDE is not set": Set the
OPIK_URL_OVERRIDEenvironment variable - "OPIK_API_KEY is not set": Required for Opik Cloud deployments
- "OPIK_WORKSPACE is not set": Optional, but can be set for Opik Cloud deployments
Debug Logging
Section titled “Debug Logging”Enable debug logging to troubleshoot issues:
export OPIK_LOG_LEVEL="DEBUG"If you are using the Opik Optimizer SDK, you can also enable optimizer-side debug logs:
export OPIK_OPTIMIZER_LOG_LEVEL="DEBUG"Or programmatically:
import { setLoggerLevel } from "opik";
setLoggerLevel("DEBUG");
Batch Queue Issues
Section titled “Batch Queue Issues”If data isn't appearing in Opik:
- Check if data is batched: Call
await client.flush()to force sending - Verify configuration: Ensure correct API URL and credentials
- Check network connectivity: Verify firewall and proxy settings
General Troubleshooting
Section titled “General Troubleshooting”Environment Variables Not Loading
Section titled “Environment Variables Not Loading”- Python: Ensure
load_dotenv()is called before importingopik - TypeScript: The SDK automatically loads
.envfiles - Verify file location:
.envfile should be in project root - Check file format: No spaces around
=in.envfiles
Configuration File Issues
Section titled “Configuration File Issues”- File location: Default is
~/.opik.config - Custom location: Use
OPIK_CONFIG_PATHenvironment variable - File format: Python uses TOML, TypeScript uses INI format
- Permissions: Ensure file is readable by your application